
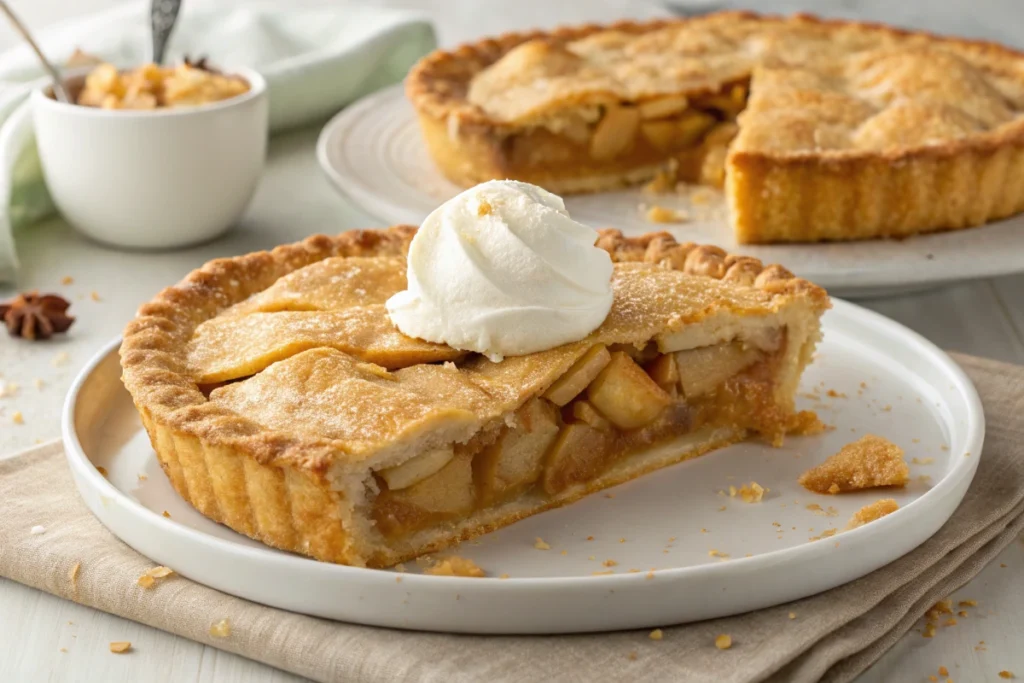
There’s something magical about a pie crust that’s perfectly flaky and buttery, one that melts in your mouth and complements the filling in just the right way. Whether you’re crafting a homemade apple pie for the holidays or a savory quiche for brunch, the quality of the crust can make or break your dish. But achieving that perfect crust? It’s an art—and a science.
Why the Right Pie Crust Matters
The pie crust is the unsung hero of every pie. While the filling may grab the spotlight, the crust provides the structure, texture, and balance to each bite. A soggy bottom or tough crust can ruin even the most decadent of fillings. On the other hand, a well-made crust elevates a simple dessert into a masterpiece.
Overview of What to Expect in This Guide
This guide dives deep into everything you need to know about making the best pie crust. From the basics of ingredients and techniques to troubleshooting common problems, we’ll walk you through every step of the process. You’ll also learn about creative variations, storage tips, and the science behind that sought-after flakiness. By the end, you’ll be ready to craft a pie crust that would make any baker proud.
Table of Contents
What is a pie crust?
Pie crusts are the foundation of pies, acting as the sturdy yet tender shell that holds the filling. While they may seem simple—just a mix of flour, fat, and liquid—their preparation requires skill and precision to achieve the perfect balance of flavor and texture.
The History of Pie Crusts
Pie crusts have a rich history that dates back to ancient times. Early pie-like dishes were made by the Egyptians, Greeks, and Romans, with crusts designed to preserve food rather than to be eaten. These early versions were often dense and thick, crafted primarily from water and flour.
The modern pie crust as we know it emerged in medieval Europe, evolving with the addition of butter, lard, and other fats to create a lighter and flakier texture. By the 19th century, pie crusts became a staple of both savory and sweet dishes, from meat pies to fruit-filled delicacies.
Key Ingredients in a Pie Crust
The beauty of pie crust lies in its simplicity. These are the essential ingredients:
- Flour: The backbone of the crust, typically all-purpose flour, creates the structure.
- Fat: Butter, shortening, or lard adds flavor and flakiness.
- Liquid: Water binds the dough and hydrates the flour, ensuring the crust holds together.
- Salt: Enhances flavor and balances sweetness in both sweet and savory pies.
Optional ingredients like sugar (for sweetness) or vinegar (to reduce gluten formation) can further refine the texture and taste.
Popular Types of Pie Crusts
While the classic flaky pie crust is the most well-known, there are several variations to explore:
- Shortcrust Pastry: Perfect for tarts and quiches, it’s crumbly and tender rather than flaky.
- Puff Pastry: Made with layers of butter and dough, it creates a crisp, airy crust.
- Graham Cracker Crust: Ideal for cheesecakes and chilled pies, it’s a no-roll crust made from crushed cookies or crackers.
- Gluten-Free Crust: A lifesaver for those with dietary restrictions, typically made with almond or rice flour.
Each type serves a unique purpose, so choosing the right crust is key to your pie’s success.
How to Make the Best Pie Crust
Crafting the best pie crust doesn’t require a culinary degree—just patience, a few essential tools, and attention to detail. With these steps, you’ll soon be on your way to mastering a flaky, buttery crust.
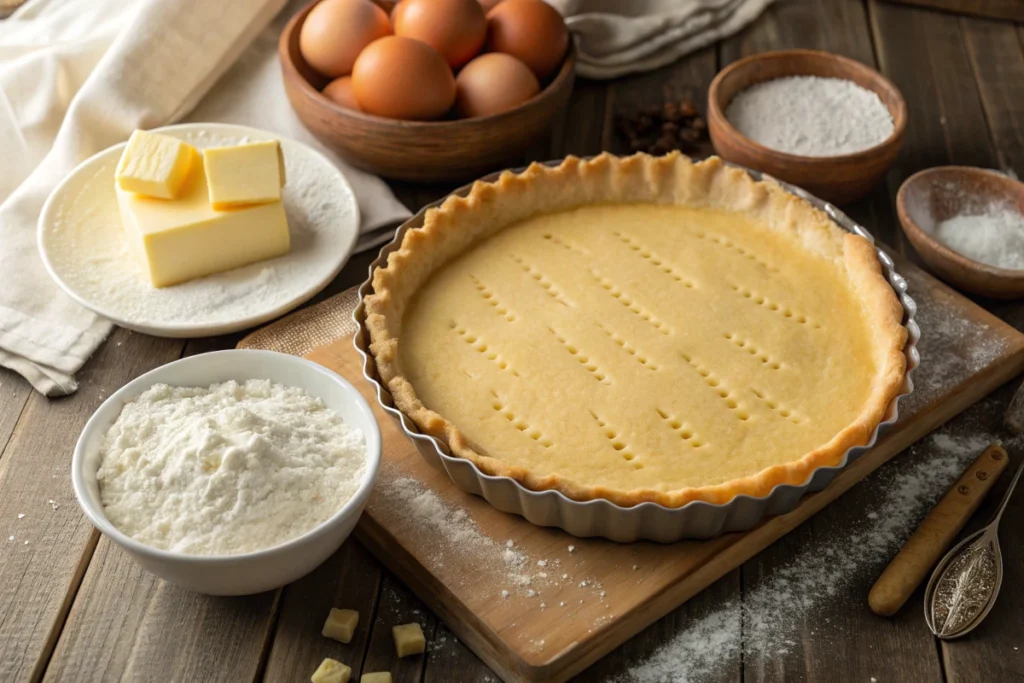
Essential Tools and Equipment
Before diving into the recipe, ensure you have the right tools on hand to make the process seamless:
- Mixing Bowls: A large bowl for combining ingredients and a smaller one for measuring.
- Pastry Cutter: To cut butter or fat into the flour evenly.
- Rolling Pin: Essential for rolling out the dough to the perfect thickness.
- Bench Scraper: Useful for handling dough and cleaning up.
- Parchment Paper: Prevents sticking when rolling or baking.
- Pie Weights: Helps blind-bake the crust without it puffing up.
Investing in quality tools can make the pie-making experience easier and more enjoyable.
Step-by-Step Recipe for a Classic Pie Crust
Here’s a foolproof recipe for a basic pie crust:
Ingredients:
- 2 ½ cups all-purpose flour
- 1 cup unsalted butter (cold and cubed)
- 1 tsp salt
- 1 tbsp sugar (optional, for sweet pies)
- 6-8 tbsp ice water
Instructions:
- Combine Dry Ingredients: In a large mixing bowl, whisk together the flour, salt, and sugar.
- Add the Butter: Using a pastry cutter, cut the cold butter into the flour mixture until it resembles coarse crumbs. Some pea-sized chunks of butter are ideal—they create flakiness.
- Incorporate Ice Water: Gradually add ice water, 1 tablespoon at a time, mixing gently with a fork until the dough starts to come together.
- Form the Dough: Gather the dough into a ball, divide it in half, and flatten each half into a disk. Wrap each disk in plastic wrap and refrigerate for at least 1 hour (or up to 2 days).
- Roll Out the Dough: On a floured surface, roll out one disk to about ⅛ inch thick. Transfer it to your pie pan, trimming any excess around the edges.
- Chill Before Baking: Chill the prepared crust in the freezer for 10-15 minutes to help prevent shrinking.
For recipes requiring a baked crust (e.g., custard pies), blind-bake by lining the crust with parchment paper, adding pie weights, and baking at 375°F (190°C) for 15-20 minutes.
Secrets to Achieving the Perfect Texture
- Keep Ingredients Cold: Cold butter and ice water are crucial for flakiness. Warm ingredients can make the dough tough.
- Don’t Overwork the Dough: Overmixing activates gluten in the flour, resulting in a chewy rather than tender crust.
- Chill, Chill, Chill: Refrigerating the dough at various stages ensures stability and prevents shrinking during baking.
These tips, when followed carefully, will yield a crust that’s both flaky and flavorful.
Common Mistakes to Avoid When Making a Pie Crust
Even experienced bakers encounter hiccups when making pie crusts. However, knowing what to watch out for can save you from common pitfalls. Here are the most frequent mistakes and how to avoid them.
Overmixing or Undermixing Dough
- Why it Happens: Overmixing activates gluten in the flour, resulting in a tough crust. Conversely, undermixing leaves you with an inconsistent texture.
- Solution: Mix just until the dough comes together. Look for a shaggy consistency where you can still see small chunks of butter.
Choosing the Wrong Fat
- Why it Matters: Different fats affect flavor and texture. For instance, butter adds richness and flavor, while shortening creates a tender, flaky crust.
- Solution: Use a combination of fats (e.g., butter and shortening) for the best of both worlds. Always use cold fats to maintain flakiness.
Rolling and Shaping Errors
- Common Mistake: Rolling the dough unevenly can lead to an inconsistent bake. Stretching the dough to fit the pan may cause it to shrink during baking.
- Solution: Roll from the center outward, rotating the dough frequently. Avoid pulling or stretching it when placing it into the pie pan.
Neglecting to Chill the Dough
- Why It’s a Problem: Warm dough is sticky, hard to work with, and can shrink during baking.
- Solution: Always chill the dough after mixing, rolling, and shaping. This firms up the fat and helps the crust maintain its shape.
Skipping Blind Baking for Certain Pies
- What Happens: Pies with liquid fillings (e.g., custards or cream pies) often end up with a soggy bottom if the crust isn’t pre-baked.
- Solution: Blind bake the crust by adding pie weights and baking partially before adding the filling.
Using the Wrong Flour
- Impact: All-purpose flour is versatile, but high-protein flours (like bread flour) create a tough crust.
- Solution: Stick to all-purpose or pastry flour for a tender, flaky result.
Ignoring Moisture Balance
- Why It Matters: Too much water can make the dough sticky, while too little can cause cracks.
- Solution: Add water gradually, just until the dough holds together when pinched.
Overbaking or Underbaking
- Problem: Overbaked crusts are dry and brittle, while underbaked ones are pale and gummy.
- Solution: Bake until the crust is golden brown. For added crispness, brush the crust with an egg wash before baking.
By avoiding these common mistakes, you’ll set yourself up for success and achieve a crust that’s as delicious as it is beautiful.
The Science Behind a Flaky Pie Crust
Creating the perfect pie crust is as much about understanding the science as it is about technique. Each ingredient and step in the process plays a crucial role in determining the final texture and flavor.
The Role of Fat in Flakiness
Fat is the star ingredient in a flaky pie crust. Here’s why:
- Fat Layers Create Flakes: When fat is cut into flour, it forms small, solid pockets. As the crust bakes, these fat pockets melt, leaving behind air pockets that create the signature flakiness.
- Choosing the Right Fat:
- Butter: Adds rich flavor and moderate flakiness.
- Shortening: Creates tender, ultra-flaky layers but lacks flavor.
- Lard: Known for its exceptional flakiness and a slightly savory taste.
- Coconut Oil: A plant-based alternative that adds a subtle, sweet flavor.
For the best results, many bakers use a mix of butter and shortening, balancing flavor and texture.
Understanding Gluten Development
Gluten, the protein found in wheat flour, is both a friend and a foe when making pie crusts:
- How Gluten Forms: When flour is mixed with water, gluten strands form, giving dough structure.
- Why Too Much Gluten Is Bad: Excessive gluten development makes the crust tough and chewy.
- How to Control Gluten:
- Use minimal mixing to limit gluten formation.
- Incorporate a small amount of acid, like vinegar or lemon juice, to inhibit gluten.
Chilling and Baking Techniques
Temperature control is essential to achieving the perfect crust. Here’s why:
- Chilling: Cold dough ensures the fat remains solid until it reaches the oven. This delay allows the fat to create air pockets as it melts, producing a flaky texture.
- Blind Baking: For certain pies, pre-baking the crust ensures it stays crisp when filled with wet or custard-based fillings.
- Even Baking: Rotate the pie during baking to ensure it cooks evenly. Using a preheated baking sheet under the pie pan can help the bottom crust bake more thoroughly.
Hydration: A Balancing Act
Water binds the ingredients together, but too much can lead to a dense, gummy crust. Use just enough to form a cohesive dough—usually 6-8 tablespoons for a standard recipe.
The Science of Flakiness in Action
When you combine all these elements—cold fat, controlled gluten, and proper chilling—you’re setting the stage for success. The result? A crust that’s perfectly golden, tender, and flaky with every bite.
Creative Variations for Pie Crusts
While a classic buttery pie crust is timeless, experimenting with variations can add a unique touch to your baking. Whether accommodating dietary restrictions or exploring new flavors, these creative twists will inspire your next pie-making adventure.
Whole Wheat and Gluten-Free Options
- Whole Wheat Crust:
- Why Choose It: Adds a nutty flavor and a slightly denser texture, perfect for hearty fillings like apple or pecan.
- How to Make It: Substitute half or all of the all-purpose flour with whole wheat flour. Increase the liquid slightly, as whole wheat flour absorbs more moisture.
- Gluten-Free Crust:
- Why Choose It: Ideal for those with gluten sensitivities or celiac disease.
- How to Make It: Use a blend of gluten-free flours like rice, almond, or tapioca flour, and add xanthan gum to mimic gluten’s binding properties. Ensure the dough is well-chilled to make rolling easier.
Sweet vs. Savory Crust Adjustments
- Sweet Crusts:
- Best Uses: Fruit pies, custard tarts, or chocolate fillings.
- How to Enhance It: Add 1-2 tablespoons of sugar and a dash of vanilla extract to the dough for a lightly sweet flavor.
- Savory Crusts:
- Best Uses: Quiches, pot pies, and other savory dishes.
- How to Enhance It: Reduce or eliminate sugar and mix in herbs, cheese, or spices like paprika or garlic powder for added depth.
Alternative Fats: Butter, Lard, and Coconut Oil
- All-Butter Crust:
- Flavor Profile: Rich, creamy, and subtly sweet.
- Best For: Dessert pies that pair well with butter’s flavor.
- Lard-Based Crust:
- Flavor Profile: Exceptionally flaky with a slightly savory taste.
- Best For: Savory pies like meat or vegetable fillings.
- Coconut Oil Crust:
- Flavor Profile: Light, with a faint coconut aroma.
- Best for: Vegan pies or those with tropical fillings like pineapple or mango.
Add-Ons for Texture and Taste
- Nuts: Ground nuts like almonds or pecans can be mixed into the dough for a unique texture.
- Cheese: Grated Parmesan or cheddar adds a savory kick to crusts for quiches or pot pies.
- Spices: Cinnamon, nutmeg, or even cardamom can infuse a crust with aromatic warmth, perfect for sweet pies.
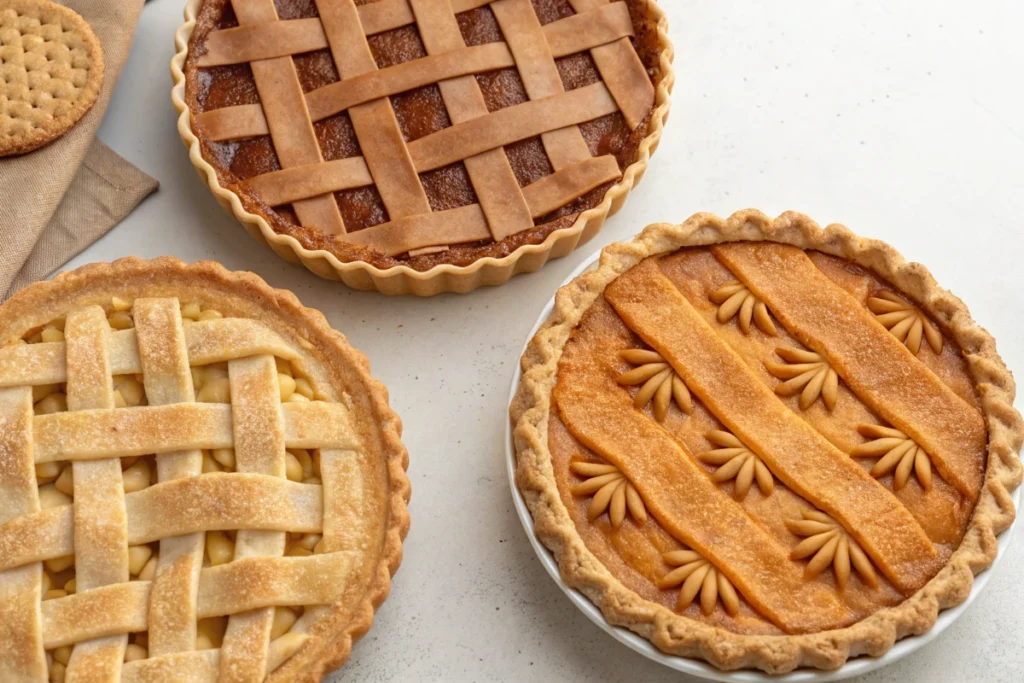
Decorative Touches
A visually appealing crust adds a professional flair to your pie. Try these techniques:
- Braided Edges: Weave thin strips of dough for an elegant border.
- Cut-Out Designs: Use cookie cutters to create shapes from excess dough and place them on top.
- Fluted Crimps: Pinch the edges of the crust with your fingers or a fork for a classic look.
Tips for Storing and Freezing Pie Crusts
Proper storage and freezing techniques are essential for saving time and maintaining the quality of your pie crusts. Whether you’re prepping for a holiday feast or just planning ahead, these tips will ensure your crusts remain fresh and ready to use.
Pre-Made vs. Homemade Storage
- Pre-Made Pie Crusts:
- Shelf Life: Store-bought crusts typically last a few weeks in the refrigerator or up to six months in the freezer.
- Best Practices: Keep them in their original packaging to avoid freezer burn.
- Homemade Pie Crusts:
- Shelf Life: Unbaked homemade dough lasts 2-3 days in the refrigerator.
- Best Practices: Wrap tightly in plastic wrap, then seal in an airtight container or freezer bag for added protection.
How to Freeze and Defrost Dough
Freezing pie crust is a game-changer for busy bakers. Here’s how to do it:
Freezing Unbaked Dough:
- Form the Dough: After mixing, shape the dough into a disk and wrap it tightly in plastic wrap.
- Double Wrap: For extra protection against freezer burn, place the wrapped dough in a resealable freezer bag.
- Label: Write the date on the package, as unbaked dough can be frozen for up to 3 months.
Freezing Pre-Rolled Crust:
- Roll It Out: Roll the dough to the desired thickness and shape.
- Layer with Parchment: Place parchment paper between the rolled crusts if freezing multiple layers.
- Flat Freeze: Lay the crust flat on a baking sheet until frozen, then transfer to a resealable freezer bag.
Freezing Fully Assembled, Unbaked Crusts:
- Prepare the Pan: Press the dough into the pie pan and shape the edges.
- Freeze in the Pan: Wrap the entire pan tightly with plastic wrap and aluminum foil. This method is ideal for pies that require blind baking.
Defrosting Tips:
- In the Refrigerator: Transfer frozen dough to the refrigerator and allow it to thaw overnight. Avoid defrosting at room temperature to prevent softening or uneven texture.
- Roll Gently: Once thawed, handle the dough carefully to maintain its structure.
Storing Baked Crusts
If you’ve baked a crust and need to store it for later use, follow these steps:
- Cool Completely: Allow the crust to cool to room temperature to avoid condensation during storage.
- Wrap and Seal: Wrap the crust tightly in plastic wrap and place it in an airtight container or resealable bag.
- Shelf Life: Store baked crusts at room temperature for up to 2 days or freeze for up to 2 months.
Quick Tips for Freshness
- Always label stored dough or crusts with the date to keep track of freshness.
- Avoid opening the freezer unnecessarily to maintain a stable temperature and prevent freezer burn.
- If your frozen dough feels dry, knead it lightly after thawing to restore its elasticity.
With these tips, you’ll always have a ready-to-use pie crust, saving you time and effort while ensuring your pies remain as delicious as ever.
FAQs About Pie Crusts
Pie crusts can be tricky, and even seasoned bakers have questions. Here are answers to some of the most common queries to help you perfect your pie-making skills.
What’s the Best Flour to Use for Pie Crusts?
Answer: All-purpose flour is the most versatile and widely used flour for pie crusts. It provides the right balance of structure and tenderness. For a more delicate crust, you can use pastry flour, which has a lower protein content, but avoid bread flour as it’s too high in protein and can result in a tough crust.
Can I Make Pie Crust Ahead of Time?
Answer: Absolutely! Pie crust dough can be made up to 2 days in advance and stored in the refrigerator. For longer storage, freeze the dough (or pre-rolled crusts) for up to 3 months. Just thaw the dough in the refrigerator overnight before using.
How Do I Avoid a Soggy Bottom?
Answer: A soggy bottom is often caused by the filling’s moisture seeping into the crust. To avoid this:
- Blind bake the crust partially before adding wet fillings.
- Brush the crust with a thin layer of egg wash and bake it briefly to create a moisture barrier.
- Ensure your filling isn’t overly watery by draining excess liquid, especially for fruit pies.
How Long Should I Chill the Dough?
Answer: Chill the dough for at least 1 hour before rolling it out. This firms up the fat, reduces gluten development, and makes the dough easier to handle. If time allows, overnight chilling can yield even better results.
Why Does My Pie Crust Shrink During Baking?
Answer: Shrinkage occurs when the dough hasn’t been properly rested or has been stretched while fitting into the pan. To prevent this:
- Let the dough rest after rolling and before baking.
- Avoid pulling or stretching the dough when transferring it to the pie pan.
- Chill the prepared crust in the freezer for 10-15 minutes before baking.
What’s the Best Way to Get a Golden, Shiny Crust?
Answer: To achieve a beautifully golden crust, brush it with an egg wash made from 1 beaten egg and 1 tablespoon of milk or water. This not only enhances the appearance but also adds a slight sheen.
Can I Fix Cracks in My Dough?
Answer: Yes! If the dough cracks while rolling, dab a small amount of water on the edges and gently press them together. For larger cracks, patch them with a small piece of excess dough and smooth it out with your fingers.
Do I Need to Use Pie Weights for Blind Baking?
Answer: Pie weights (or dried beans/rice) prevent the crust from puffing up during blind baking. While not absolutely necessary, they ensure an even, flat base for fillings. If you don’t have weights, prick the bottom of the crust with a fork to release steam.
How Do I Store Leftover Pie Crust?
Answer: Wrap leftover dough tightly in plastic wrap and refrigerate for up to 2 days. For longer storage, freeze it in an airtight container for up to 3 months. Let it thaw in the refrigerator before rolling.
With these answers in mind, you’ll be better equipped to tackle any challenges that come your way as you strive to create the perfect pie crust.
Conclusion
Summing Up the Secrets to the Best Pie Crust
Mastering the art of the best pie crust may seem intimidating, but it boils down to a few key principles: choose quality ingredients, handle the dough with care, and take your time. By understanding the science behind flakiness, learning from common mistakes, and experimenting with creative variations, you can consistently produce a crust that complements any filling.
Whether you’re baking a classic apple pie, a savory chicken pot pie, or a decadent chocolate tart, the crust serves as the foundation that brings your creation to life. By following the tips and techniques outlined in this guide, you’ll impress your family, friends, and even yourself with every bite.